Google maps is web mapping service developed by Google. Google launched the Google maps free service on 8 February 2005. Since then it is became continuously popular among regular peoples and mobile application developer. In react native we can easily Integrate Google Maps in Android iOS application using react-native-maps NPM GitHub library. react-native-maps library is popular between developers and it has more than 60 thousands download weekly. So now we know how much Google Maps is used by react native developers in their applications. In this tutorial we would learn about Authenticating Google Maps API key in react native app and show user shop or company location by a red dot Marker using Latitude and longitude. So let’s get started .
Contents in this project React Native Integrate Google Maps in Android iOS App Example Tutorial:
1. Open your react native project folder in command prompt and execute below command to install the react-native-maps library in your current react native project. If you are using windows then make sure run the Command prompt as Run as Administrator mode.
|
1
|
npm install react–native–maps —save
|
Screenshot of CMD:
2. After executing above command we need to run the
react–native link command to refresh our current react native project and index the newly installed library file in our project. This command would automatically add all the important dependencies line in your project automatically by editing all your files.
 3. If you still face any installation issue then you can read its official installation documentation Here. But there is no need to worry because i have used the link command it would automatically implement all the required changes in my react native project. We need to edit the AppDelegate.m file in iOS to implement Google Maps so read the documentation here.
4. Generate the Google Authentication API Key From Google Developers Console:
1. If we wish to use the Google Maps in our application then we need to get the Google Maps API key from Google developers console. So Open Google Developer Console link in your web browser and log-in with your Google gmail account. Now we need to create a new project for use Google Maps. So create new project and enter your project name. The name can be anything but it must be unique. Then hit the Create button.
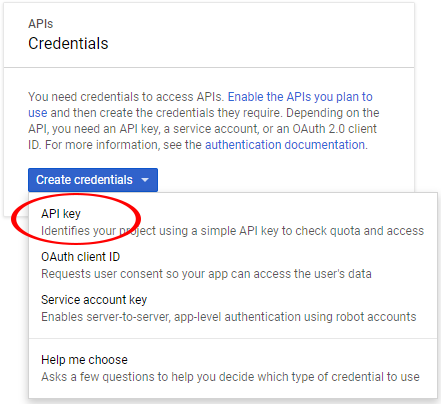
 2. Select your newly created project from upper selecting drop down window -> Credentials -> Create Credentials.
 3. Now select API key under Create Credentials drop down menu.
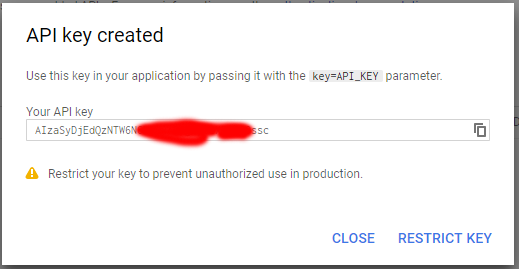
 4. You’ll see a pop up dialog saying API key created. Copy the API key at someplace else because it will be used further in our project.
 5. Now we need to Enable the Maps SDK for Android. To enable Select the Hamburger Icon present at the left side of screen -> Google Maps -> Overview. Sometimes the Google Maps is not present there so simply search on the search bar .
 6. Select the Maps SDK for Android .
 7. Enable the Maps SDK by pressing the Enable button.
 Here you go now after enabling the Maps SDK for android. Your project is ready to use the Google maps in your react native project. Its time to start coding .
5. Goto Your_React_Native_Project -> android -> app -> src -> main -> AndroidManifest.xml file. Add below meta data with Google Maps API key you have copied earlier.
|
1
2
3
|
<meta–data
android:name=“com.google.android.geo.API_KEY”
android:value=“Put your API key Here”/>
|
Source code of my AndroidManifest.xml file:
|
1
2
3
4
5
6
7
8
9
10
11
12
13
14
15
16
17
18
19
20
21
22
23
24
25
26
27
28
29
30
31
|
<manifest xmlns:android=“http://schemas.android.com/apk/res/android”
package=“com.project2”>
<uses–permission android:name=“android.permission.INTERNET” />
<application
android:name=“.MainApplication”
android:label=“@string/app_name”
android:icon=“@mipmap/ic_launcher”
android:roundIcon=“@mipmap/ic_launcher_round”
android:allowBackup=“false”
android:theme=“@style/AppTheme”>
<meta–data
android:name=“com.google.android.geo.API_KEY”
android:value=“AIzaSyDjEdQzNTW6N6NbwxAIOgzp0eXDbSO9ssc”/>
<activity
android:name=“.MainActivity”
android:label=“@string/app_name”
android:configChanges=“keyboard|keyboardHidden|orientation|screenSize”
android:windowSoftInputMode=“adjustResize”>
<intent–filter>
<action android:name=“android.intent.action.MAIN” />
<category android:name=“android.intent.category.LAUNCHER” />
</intent–filter>
</activity>
<activity android:name=“com.facebook.react.devsupport.DevSettingsActivity” />
</application>
</manifest>
|
6. Now its time to start coding. So Open your project’s App.js file and import StyleSheet & View component.
|
1
2
|
import React, { Component } from ‘react’;
import { StyleSheet, View } from ‘react-native’;
|
7. Import MapView & Marker component from react-native-maps library.
- MapView : Used to show the MapView component in your project.
- Marker : Used to show the Red round market to pinpoint the exact location on Google Maps.
|
1
2
|
import MapView from ‘react-native-maps’;
import { Marker } from ‘react-native-maps’;
|
8. Create MapView component in render’s return block in a Root View. Inside the MapView we would make a Marker component to pinpoint a specific location.
|
1
2
3
4
5
6
7
8
9
10
11
12
13
14
15
16
17
18
19
20
21
22
23
24
25
26
27
|
render() {
return (
<View style={styles.MainContainer}>
<MapView
style={styles.mapStyle}
showsUserLocation={false}
zoomEnabled={true}
zoomControlEnabled={true}
initialRegion={{
latitude: 37.78825,
longitude: –122.4324,
latitudeDelta: 0.0922,
longitudeDelta: 0.0421,
}}>
<Marker
coordinate={{ latitude: 37.78825, longitude: –122.4324 }}
title={“Marker Title”}
description={“Marker Description Text”}
/>
</MapView>
</View>
);
}
|
9. Creating Style.
|
1
2
3
4
5
6
7
8
9
10
11
12
13
14
15
16
17
18
|
const styles = StyleSheet.create({
MainContainer: {
position: ‘absolute’,
top: 0,
left: 0,
right: 0,
bottom: 0,
alignItems: ‘center’,
justifyContent: ‘flex-end’,
},
mapStyle: {
position: ‘absolute’,
top: 0,
left: 0,
right: 0,
bottom: 0,
},
});
|
10. Complete source code for App.js file class.
|
1
2
3
4
5
6
7
8
9
10
11
12
13
14
15
16
17
18
19
20
21
22
23
24
25
26
27
28
29
30
31
32
33
34
35
36
37
38
39
40
41
42
43
44
45
46
47
48
49
50
51
52
53
|
import React, { Component } from ‘react’;
import { StyleSheet, View } from ‘react-native’;
import MapView from ‘react-native-maps’;
import { Marker } from ‘react-native-maps’;
export default class App extends Component {
render() {
return (
<View style={styles.MainContainer}>
<MapView
style={styles.mapStyle}
showsUserLocation={false}
zoomEnabled={true}
zoomControlEnabled={true}
initialRegion={{
latitude: 37.78825,
longitude: –122.4324,
latitudeDelta: 0.0922,
longitudeDelta: 0.0421,
}}>
<Marker
coordinate={{ latitude: 37.78825, longitude: –122.4324 }}
title={“Marker Title”}
description={“Marker Description Text”}
/>
</MapView>
</View>
);
}
}
const styles = StyleSheet.create({
MainContainer: {
position: ‘absolute’,
top: 0,
left: 0,
right: 0,
bottom: 0,
alignItems: ‘center’,
justifyContent: ‘flex-end’,
},
mapStyle: {
position: ‘absolute’,
top: 0,
left: 0,
right: 0,
bottom: 0,
},
});
|
Screenshots:


